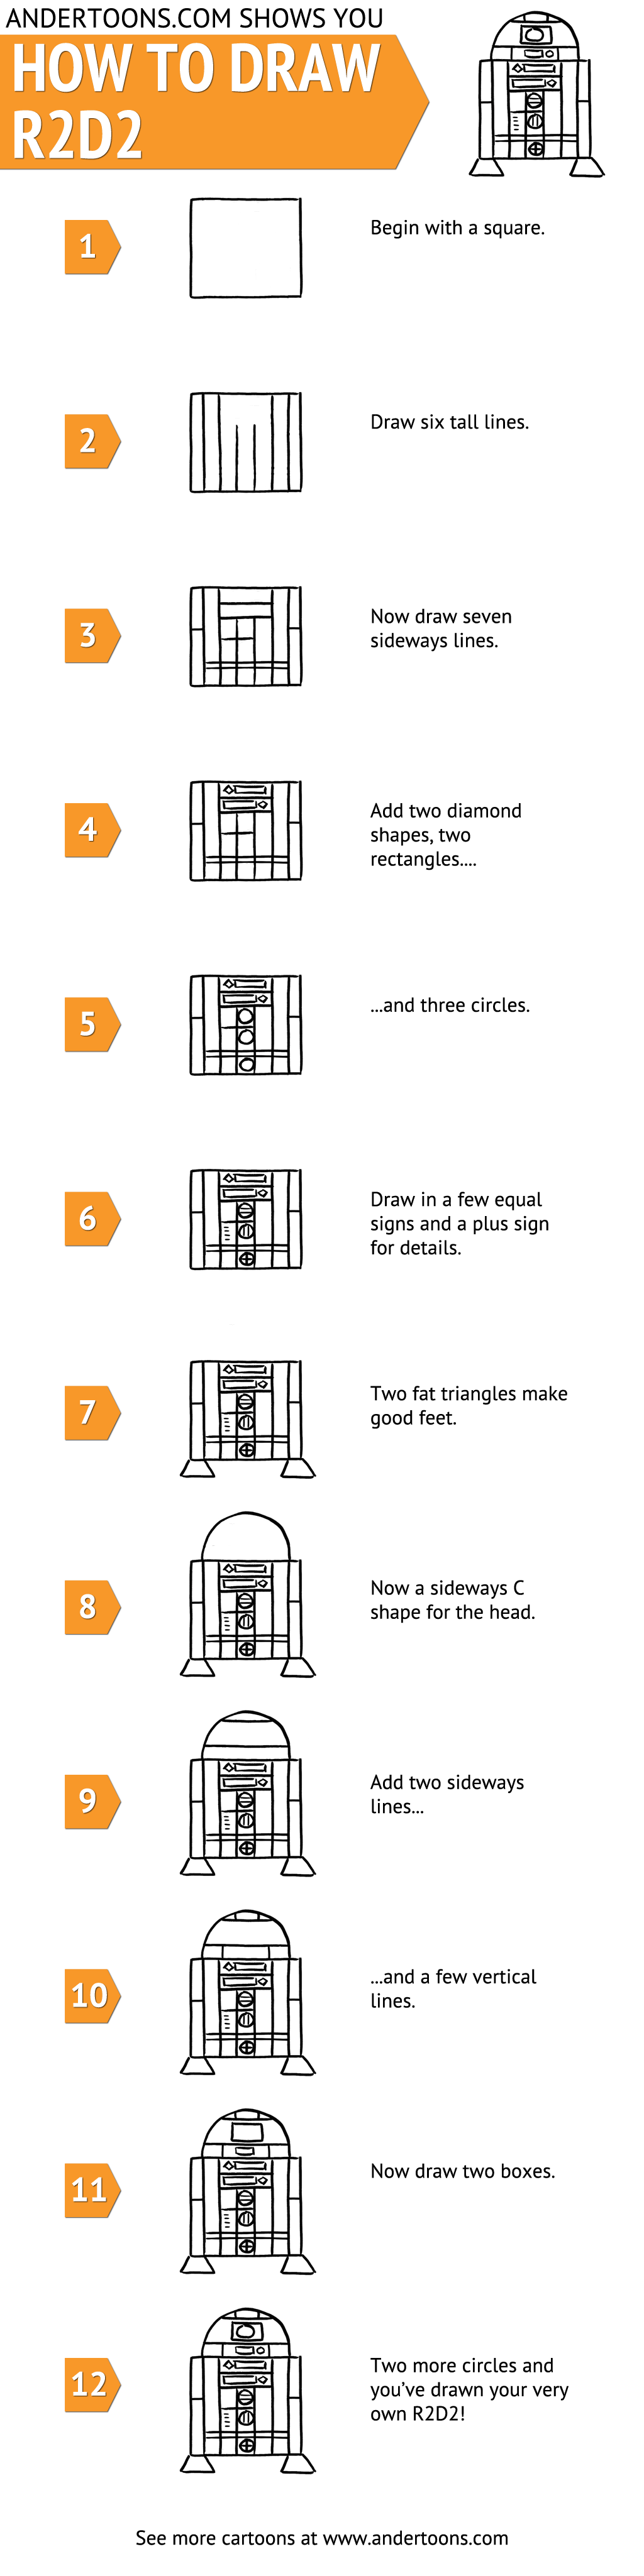
R2D2 is probably my favorite robot of all time. So, with May the 4th coming up in a few days, I thought I’d show you an easy way to draw your very own cartoon R2D2! And don’t worry, I’ve got a good feeling about this! (BTW, you can click the image to enlarge it.)
When you’re finished, feel free to tweet, pin, email or otherwise share a pic of your cartoon R2D2 with me and I’ll post it here at the blog! Enjoy!
Not bad, huh? Feel free to check out my other tutorials too:
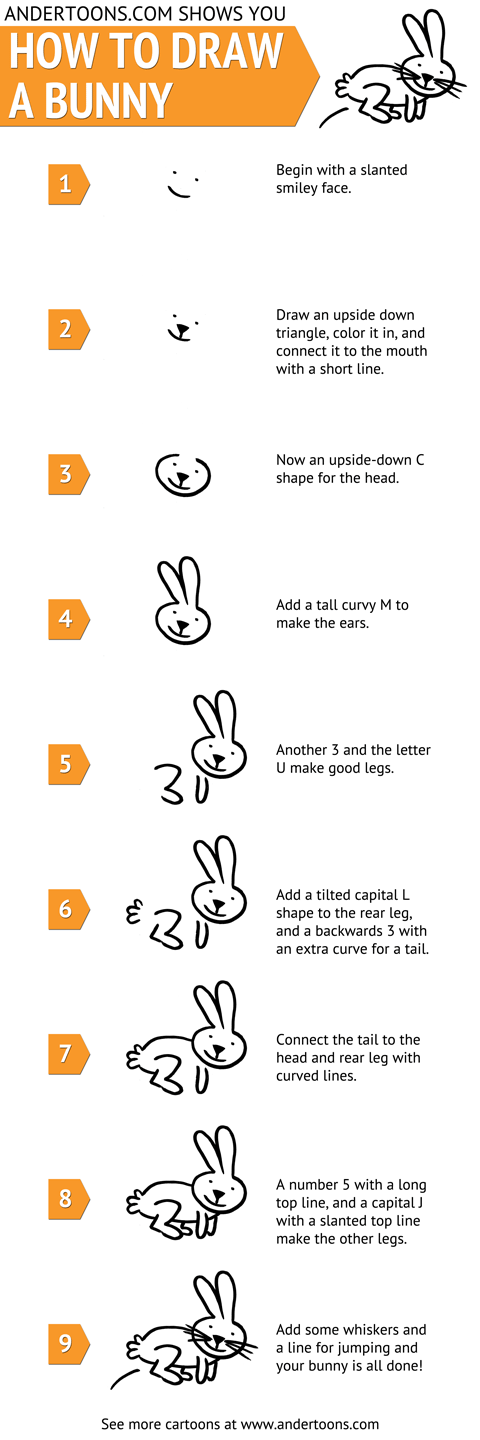
Easter is coming up fast, so I thought this week I’d show you how to draw a cute cartoon bunny in just nine easy steps. (Just don’t draw more than one. You know how bunnies are.)
When you’re done, feel free to email, tweet, pin, share, or Flingle (I made that one up) a pic of your cartoon bunny and I’ll post them right here at the blog!
If you liked that, you should check out my tutorials for drawing an elephant, and a leprechaun!
With only a very short time to engage a reader, getting a cartoon’s caption right is essential. So I made this short video on how I edit cartoon captions to get to the point. Enjoy:
If you’re interested in seeing more about how I write cartoons, check out these blogs:
Mark Anderson: Hello, I’m Mark Anderson from andertoons.com, and this is a short video in which I’m going to show you how I edit my gag cartoon captions from their long, wordy original form, down to what I hope is a short, punchy, final funny caption, so let’s get started.
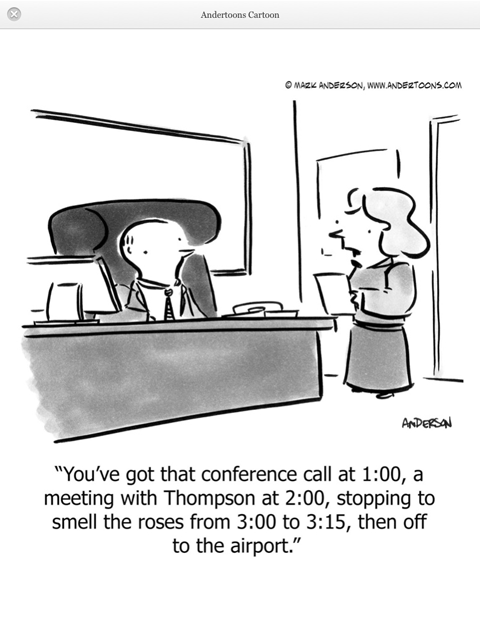
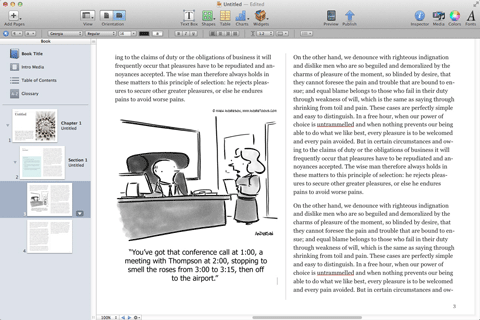
Here is the cartoon we are going to be demonstrating this with. The idea here is that this gentleman is giving a presentation with a Venn diagram that’s so complicated, that he had to use a Spirograph toy to do the diagram, and here is the original caption that I came up with:
“Okay, listen up everyone. I was up all night working on this, plus I’ve had to use a Spirograph…”
So all of the ideas are there, you have the Spirograph, I like that use up all night working on this, because it’s difficult, he wants everyone to pay attention, it’s all there, but it’s much too long, and it’s very varied, but this is just where we are going to start and we are going to begin pruning it back little by little, because usually brevity is wit.
While some very long captions are very funny, generally shorter is better, we only have a couple seconds to set the scene, introduce the characters; get the joke across, so a shorter caption in general is better, so let’s start editing.
Here is take two on this:
“Listen I worked all night on this, and I had to use a Spirograph to boot…”
This is still too long, and it sort of feels, it’s supposed to be unfinished, the sentence is unfinished, but this, it feels awkward at the end, and I think it’s to boot. That’s a phrase I use a lot, but I just don’t think it works here, so, and let’s take another shot at this:
“I was up all night with this and I had to use a Spirograph, so listen up people…”
Generally, I like to put the, like the joke part of the joke, for lack of a better way to put it, at the end of the caption, but I moved it to the middle here, and I really wish I could give you a good reason why, it just felt better to me. I like the idea that he’s up all night, and he had to use a Spirograph, and listen up people. So it just seemed to work better to me, but this is still too long a caption, so let’s take another shot:
“This took me all night, and I had to use a Spirograph, so everyone listen up…”
It’s getting better, we started with 20 words, and we are down to, I’m looking at this real quick here, 16? So we are getting better, we are getting shorter, it’s the, it’s getting punchier, but still we can, we can do better:
“This took me all night, and the use of a Spirograph, so everyone listen up…”
I like this better, but you try different words, you try different phrases, the use of is awkward, so it’s a good try, but we are going to take another shot:
“This took me all night, and a Spirograph, so everyone listen up…”
This is definitely better; this is pretty close to what the final caption ends up being, but we could still do better here, so let’s take another shot at this:
“This took me all night, and a Spirograph, so focus, people…”
I like “focus people,” “focus people” works better, me reading it out loud, than it actually does in print, I don’t know why that is, I think you bring something to it when you read it out loud, but it just doesn’t, if you take a second and read it, and feel free to pause as read, it doesn’t work as well in print as it does out loud, so let’s grab that:
“This took me all night, and a Spirograph, so everyone pay attention…”
It’s definitely getting better, we are really trimming this back, we are close, let’s take another shot:
“This took me all night, and a Spirograph, so pay attention…”
This is the final caption that I ended up with this on this cartoon, and I think it turned out pretty nice, you’ve got every thing you need in there, that he was up all night, that he had to use a Spirograph, because this was so complicated, that he wants people to pay attention to what he’s talking about, so I think we’ve trimmed it back as far as we’re, you know what actually when I was looking at this for this video, I could trim it back one more word, I’ll show you what that ended up being:
“This took all night, and a Spirograph, so pay attention…”
You know what, you lose the word “me” at the beginning of this, but what, this is really, this is really nerdy cartoonist. When you take out the word “me”, I get the idea that maybe he had somebody else working on it, and that he actually didn’t do, and that takes away from the humor, wow you can really over think this stuff, and I probably have, my goodness, but let’s put the word “me” back in, and it just works better:
“This took me all night, and a Spirograph, so pay attention…”
That’s the final caption, I think we got it, trimmed it down from 20 words at the outset, to 11 words now, it’s short, it’s punchy, it’s got every thing you need, and how much fun are Spirographs, come on.
So that’s it for, how I edit my gag cartoon captions, I hope you enjoyed it. Feel free to visit andertoons.com and check out all of the other cartoons I have there, so thanks for watching.
As I’m sure you’ve heard, Apple recently entered the textbook market in a big way. They’ve partnered with Pearson, McGraw Hill, and Houghton Mifflin Harcourt, revamped the iBooks app/store, and created the iBooks Author application to make publishing and selling books quick and easy. This is a big deal, and I’ve got a front row seat being married to an educator and having two children in school.
But as exciting as it is educationally, as a cartoonist I’m thrilled not only by the self-publishing opportunities for myself and other artists, but by what could conceivably be a whole new market for cartoons.
I can imagine all kinds of people writing and selling all kinds of books via iBooks Author, so I thought I’d explain the process of inserting a cartoon (or any other graphic) to help liven up all of that text.
Starting Your iBook
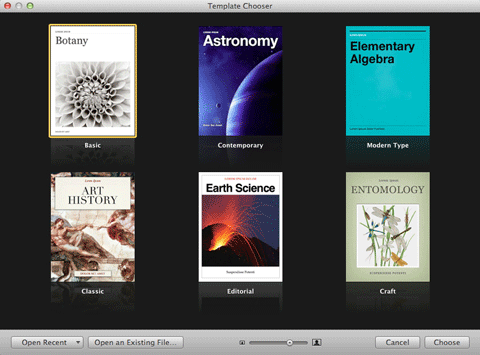
The first thing you’ll need to do is download the free iBooks Author app from the App Store and wait for it to install. Open iBooks Author and you’ll be greeted with the Template Chooser:
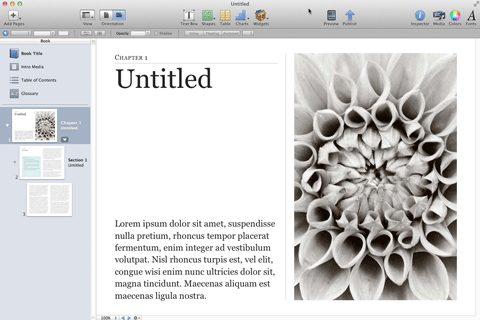
For the purpose of this tutorial we’re going to choose the generic Botany textbook. Click on it and you’ll be greeted with the book’s first chapter in landscape orientation:
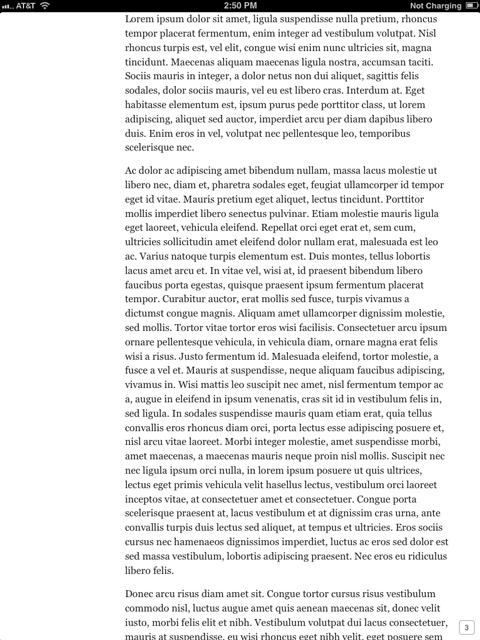
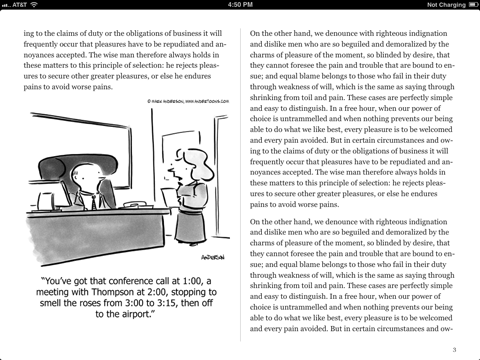
Apple has already included a stock image to show you how much an image can improve your book, but we’re going to navigate to page three where there’s a huge swath of text just waiting for a funny cartoon to liven things up:
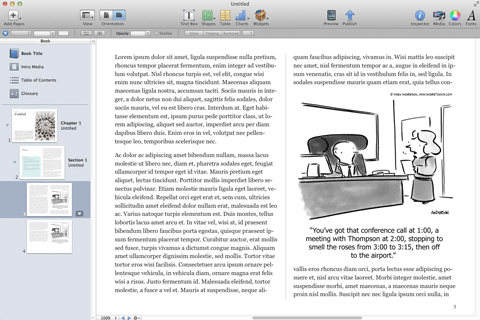
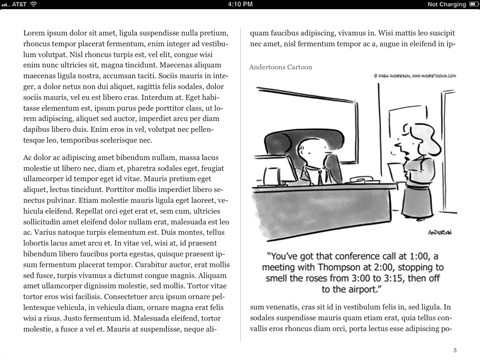
Because this is a botany iBook, I’ve chosen this one about roses:
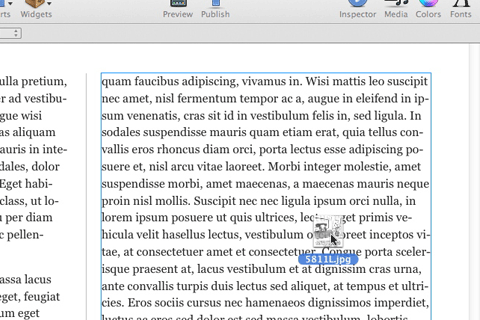
There’s a number of ways to import your image, but I’m just going to grab the JPEG off of my desktop and drag it over the text:
Here’s how the image looks inserted into the text:
Nice, huh? Just what all those words needed.
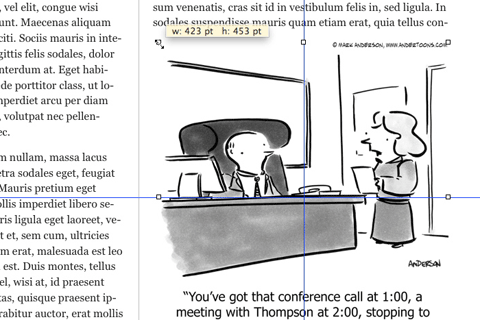
The cartoon is placed on the page by default as either an anchored or floating object (that will be important later) which can be moved, resized, and aligned with some intuitive clicking and dragging:
Now our iBook page is looking just like we’d like it to. Let’s preview it on our iPad to see how it will look to our soon-to-be readers.
Connect the iPad to your computer, open iBooks, and, if you’re like me, you’re going to preview it in portrait orientation first:
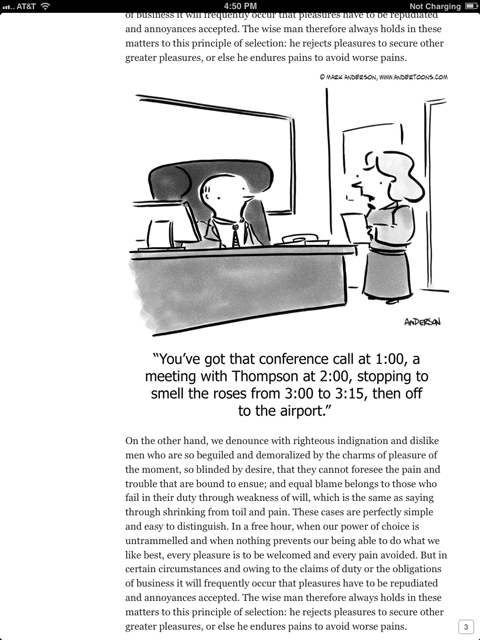
Here’s a screen shot of page 3 from my iPad, but where’s the cartoon!? And what’s with all that white space on the left? Flip the iPad 90 degrees and you’ll see it appear in landscape orientation exactly as you inserted it:
So what’s going on? Where’s the cartoon in portrait?!
There are two ways to deal with this. The first changes some elements of the existing image, the second is a different way of bringing images into your iBook. Let’s start with what I think is the simpler of the two:
Adding a Title or Caption
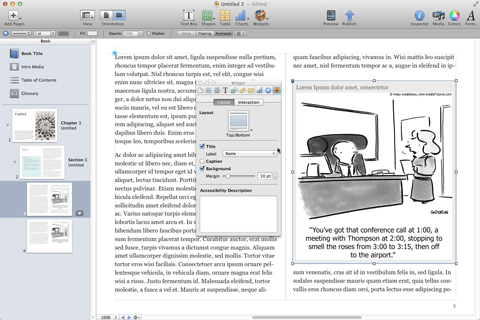
Images imported into iBooks Author are referred to as objects, and there are three different kinds of objects. You might remember earlier I said that images are inserted by default as either anchored or floating objects. Those two types of objects don’t appear in portrait orientation unless you give them either a title or a caption. Thankfully, that’s pretty easy to do.
Click on your image, then click Inspector in the upper right menu bar. Next click the rightmost icon in the Inspector menu; it looks like a folder with a gear on it. (If you leave your mouse on it you’ll see “Widget Inspector.”)
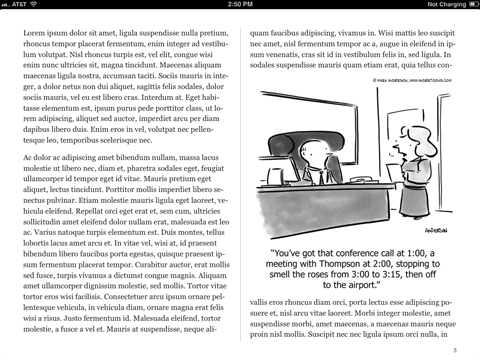
Click the Title check box underneath Layout and your cartoon now has a dummy text title as well as a light gray border around it:
You can also opt to add a caption below the image instead, but since the image we’re using is a cartoon, I chose a title. I also played with the background and margin settings. Now let’s look at it in portrait orientation again on the iPad:
There it is in the upper left, and when you click on it:
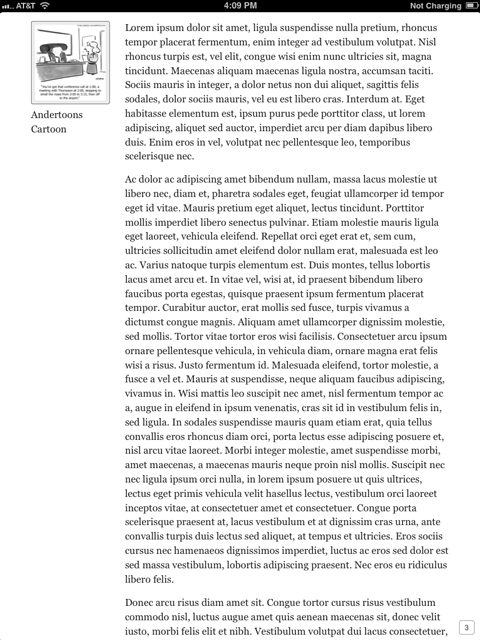
Pretty nice. Here it is in landscape again with the title over the cartoon:
Now, you might not want that extra text above or below your image. In that case, still click Title or Caption, but just delete the dummy text and don’t replace it with anything. You get a little extra padding on the top and/or bottom, but it’s not obvious.
Adding A Cartoon Inline
I said earlier that there was another way to insert your cartoon into the text to make sure it appears in portrait mode, and that is to change the image to an inline object. This is best done when you’re first inserting the cartoon into the text, but it’s still fairly simple.
Let’s begin again with a page 3 full of text:
You could drag in your image and then change the object type to inline, but I’ve gotten some wonky results that way. Here is what I think is a better way to add images inline.
First, choose roughly where you’d like to add the cartoon and insert a blank line there. For this example I’m going to add it before the second paragraph on the left half of this page:
Now this is where it gets tricky. Press and hold the Command key, then drag the image off of your desktop and into the document where you left your blank line:
It might take a little trial and error, but you’ll soon get the hang of it.
And now when we preview on the iPad we see the cartoon inline in both landscape and portrait orientations:
With the inline method of inserting your cartoon there’s also no need for title or captions. In fact those are not available to an object designated as inline.
You might be asking yourself why you’d want to present your images inline, but if you’re considering publishing an iBook collection of cartoons where there’s very little text, inline begins to make a whole lot of sense.
As exciting as this new opportunity is, both as a potential publisher and content provider, there’s bound to be some glitches in this first iteration of iBooks Author, but I’m finding it hard not to daydream about the possibilities. And I can’t wait to see how other people use this new tool!
So now that you understand how to insert a cartoon or other image into your new iBook, there’s the small matter of…
Buying Your Cartoon
Of course the first step to adding a cartoon is to find a relevant cartoon you’d like to include in your iBook. Andertoons has thousands of cartoons on thousands of topics that are super easy to browse, buy, and download. That being said, this is a brand new market and I’m a bit unsure as how to proceed as far as price.
Normally I charge hundreds of dollars per cartoon for textbook usage, but I’m envisioning a lot of independent authors self-publishing via iBooks Author, so I’m going to begin selling iBook cartoon usage at the $30 per I currently charge for presentations.
If you’re interested in buying a cartoon for your iBook, just click the $30 presentation button and follow the checkout – no need to email me for permission. If you’re a big name publisher, drop me a line and we’ll work out something fair.
I hope this helped explain how to add a cartoon or other image to your new iBook via iBooks Author. Anyone have have any big plans for an iBook?
Valentine’s Day is even closer now, and everywhere I look pretty much everything is covered in pink hearts, cherubs, chocolate, roses, or some combination thereof, (mmmm… chocolate cherub…) so I thought I’d share another love cartoon collection to get us all in the mood!
This is of course a take off on the ol’ relationship chestnut “I just think maybe we should see other people.” I suppose the manager here thinks she’s letting the poor guy down easier, and it’s certainly better than being escorted out by security with your cardboard box of tchotchkes and stolen pens, but maybe a middle ground would be better. (Scented pink slip?)
Cats and dogs hate each other, right? Apparently not if the above cartoon is to be believed. (And it is!)
For me the hardest part of this was coming up with the name of the show’s host and creating a TV set that got you to the joke without being too showy. I can imagine a mid-afternoon talk show with a sensibly pretty host named Jenny, can’t you? Oh what reasonable life-affirming advice she’d share. Sigh…
And dig those pants and heels! Can I draw fashion or what?!
The basic idea here is that ol’ Frankenstein is made up of other old body parts, and the Mrs. is jealous of “his” tattoo. Wow, now that I think of it this is actually kind of grisly.
I loved drawing her hair in this, although the first draft had that white stripe in her hair looking more like frosting on a Hostess cup cake.
Just in case you can’t read it on the paper the guy is holding, it says “Demands” on the top.
I bet dogs get tired of unconditional love. They give and they give and they give and then you drop some meatloaf on the floor and you don’t even call them over and let them have it.
You watch, conditional love is the next big thing. Also jetpacks.
I always thought that whole arrow in the heart now you’re in love thing was a little odd. I mean that flying baby just shot you! In the chest!! That’s not love afterward, that’s heart trauma!
On a side note, if you get hit in the liver it makes you want a sandwich. No one knows why.
OK, this is an older one and you can see my art hasn’t really solidified yet, but it’s a particularly favorite theme of mine: angry holiday character in bar.
I’ve done turkeys, the Easter Bunny, Santa, the Grinch, Scrooge, etc… Apparently they’re all heavy drinkers and they’re all surly. Happy holidays!
Well, that does it. Just in case you missed it, be sure to check out last week’s cartoon love blog. You’ll love it! Ha! Ha-ha! See what I did there? HA-HA! Love…