Apple Pencil & iPad Pro – Making the Switch

in January of 2015 I went from pen and paper to working completely digitally on a Wacom Cintiq. This January I moved from the Cintiq to an iPad Pro with the Apple Pencil and, although it took some time to adjust, I love my new setup.

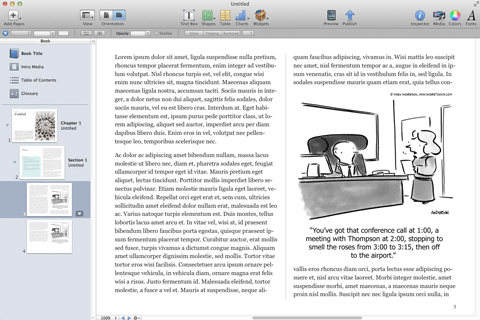
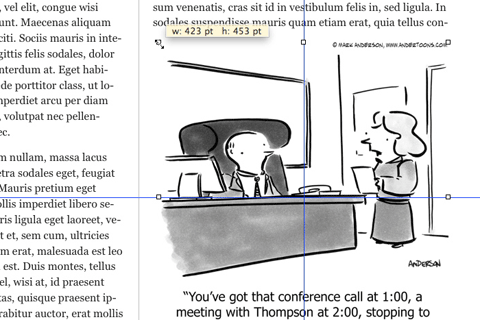
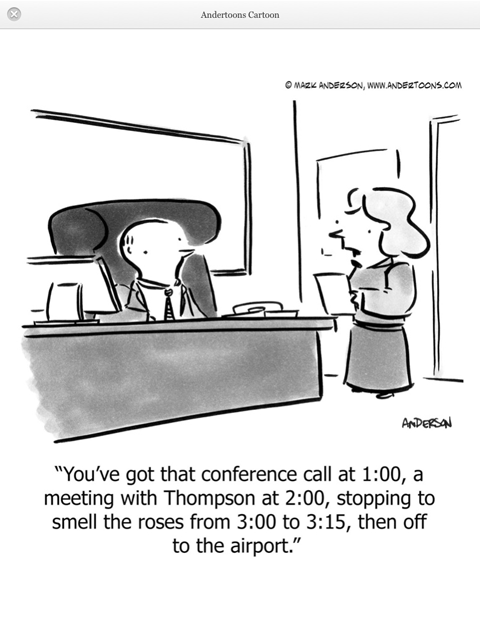
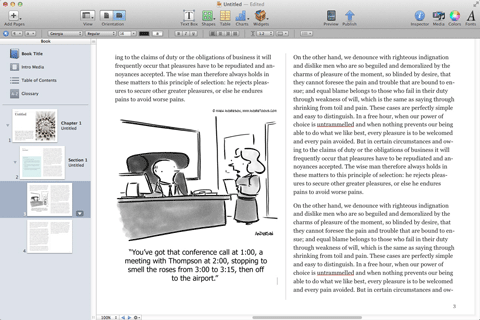
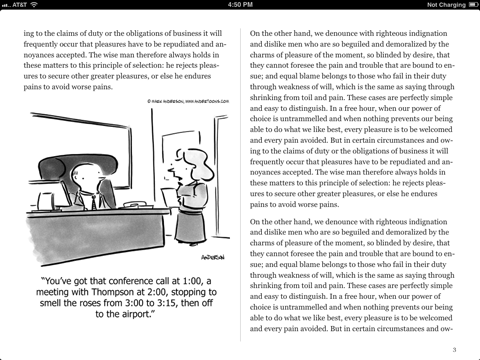
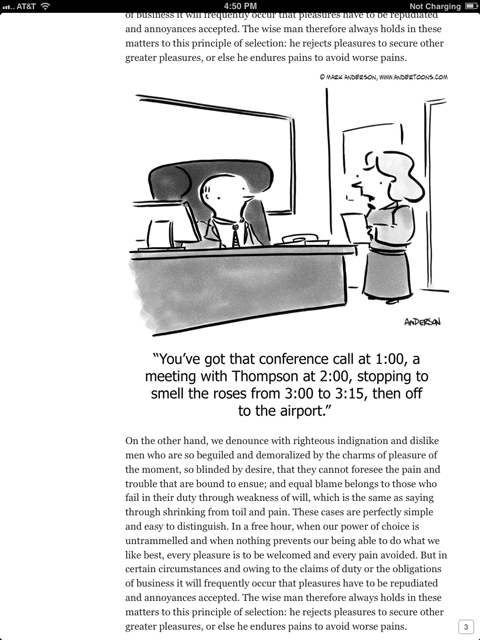
I recorded this short video to show how it all works, and I’ve included the cartoon I drew underneath. Enjoy!

Apple Pencil Cartoon Example

Apple Pencil in the Andertoons studio

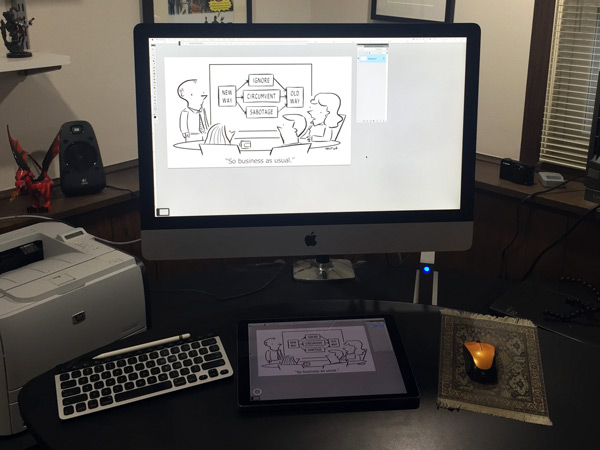
Cartooning with the iPad Pro and Apple Pencil Video Transcript

Hi there Mark from Andertoons.com here, just recently I switched over from using the Wacom 13-inch HD Tablet to the iPad Pro and Apple Pencil so I thought I would give you a short video here showing you how I’m using it, what I think of it, and how I’ve incorporated it into my daily work flow. So there is the iPad Pro right down there, I’ve got Photoshop up, I’ve got this, I’m actually using my iPhone hanging off of my iMac looking at my iPad and my Apple Pencil here. So this is the Apple Pencil, as you can see I have a giant meaty hand, but the Apple Pencil, I think is really super confortable, here is the recharging thing. I’ve only had to recharge it once or twice but it recharges really quickly and I haven’t lost the cap yet, so that’s a good thing. The nib is really nice and you can take it off and put on a new one, but I don’t think in all the years that used my Cintiq or Intuos or whatever Wacom Tablets – I don’t think I ever changed a nib, so I’m not real worried about it, we’ll see if it holds it up, I think it will, I got to say it feels a lot smoother on the tablet than the Wacom did.

So anyway, so let’s get down to some drawing here and I will show how I’ve been using it. Now I still have a keyboard over here that I use for my Photoshop shortcuts, I’m using Astropad, there is a little panel here that you can bring out and have, I have some tools setup there, but frankly I use a number of a wide enough array of tools and I don’t want to be toggling this thing in and out all the time, so I still use my keyboard for a lot.

Drawing with Apple Pencil

Alright so let’s get down to drawing, I’m going to do sort of one of my standard like business cartoons here where everyone is at a table, here is that and it feels super smooth here, again I’m using Astropad and when you draw it sort of gives you this little purple line that took me little bit to get used to, but now I’m super used to it. Also I got to tell you I’m not super great at Photoshop, you are probably going to be watching this and going like oh my God why is he doing it that way, why is he doing this way, I’m only going to show you the line art to you that I’m doing, because I have an assistant who helps with my shading now and coloring. So really all I’m responsible for nowadays is the line art and so I will just give an idea of how that’s going.

So alright so let’s draw a person here I’m going to sketch him in, you can see it’s really quick and the arrow, I have got the nice little marker, they have a little X to show me where stuff is going, I’m just using a, one of the things I like about this is I’m just using a standard like hard circle that’s in Photoshop. I used have a when I use the Cintiq I had some special brushes in there to make it look more like an ink brush and there was – it was slow, but I found using the iPad Pro and the Apple Pencil that I can draw very quickly and still get a line that I like and I will show you more variances in line here a minute but I can go really quick with it and it gives me the look that I’m used to having, and I really like it. So here is the guy, alright.

Sometimes, okay there we go, this didn’t use to work as well in Astropad, but it’s been working better lately, the pinch and zoom. So I’m going to bump this up to 75 and give you an idea, see look at that, that line looks really nice, gives me some nice variations, I’m hoping you can see this way up there, if I look at this and it’s not looking good I will zoom in. Now normally I would like turn the iPad around as I’m drawing like I used to do with paper, but because I want you to be able see what I’m doing I’m not going to doing that, I don’t want anybody getting sea sick when I’m working so… let’s go back up to here, draw this guy’s nose. See it’s really responsive and I get some really nice changes in line there, so I will drop that sketch back out, looks good. What I’m using is Astropad, it’s an app that you can buy and have it both on my Mac and on my iPad and its wireless, they talk to each other via Bluetooth as does my keyboard which is I think, I was wondering like could I have a Bluetooth mouse, a Bluetooth iPad and a Bluetooth keyboard and the Bluetooth pencil and have this all going at the same time and have it work and it really does work really well.

Apple Pencil & Astropad

So Astropad basically what it does is just copies what I have on my computer screen, start a new layer here, it copies what I have on my screen on my iPad, so like I can’t show you this without taking the camera down, but what I have on my iMac screen is what I’m seeing on the iPad Pro. So when I draw here, my kids love to come into my office and watch this now, because I will draw here and make them sort of see it on the iMac as I’m drawing and they think that’s really fun. So let’s draw somebody else here, I’m going to sketch in someone. You don’t realize how difficult it is to talk and demonstrate and make some sort of coherent thing, because I’m worried, am I drawing well, is this looking okay, am I talking enough, so I apologize if this feels a little wonky. Okay so I’m going to put her right about there, drop that down, create a new layer and it is going. See that’s working a lot better now.

Alright so we will draw, I’m going to drop this out of here so that I don’t have to look at that stuff. You know what I’m going to have her talking, I forget, so I’m going to put that there, I’m not sure I like that hair, but the line, boy it’s nice isn’t it? Like I said the drawing on – well drawing on a screen, I just realized I didn’t increase my brush size, see I told you I’m not good with this stuff, I found out over the years a way that works for me and it’s probably inefficient and like I said cringe inducing in people who are really good at this stuff, but at some point you just need a system that works for you. Oh look at that, now see. Just in case you are wondering, that’s not me like “oh yeah, oh I can draw.” No that’s just me trying to go like “oh I really like the way this pencil works,” see like the nice variance in line there and it really keeps up with my drawing because I draw really fast I think, there is that and here is the chair, alright its back up here, take a look at this, we’ll drop out that sketch part, boy that’s not looking too bad.

Apple Pencil & Other Apps

So I have tried some other apps, I’ll see if I can back up here, I have tried Procreate, I did this piece entirely in Procreate one day at the library, I just wanted to see if I could do a whole cartoon from scratch and I can, and this one was a good candidate for that because it doesn’t have any text and it turned out really good but took me a long, it took me longer than it would take me using Astropad and Photoshop and I assume that some of that is just that I’m more used to tools in Photoshop than I’m in Procreate, but it did take me longer. That being said it’s nice to know that if want to I could take this on the road and do a cartoon from beginning to end. The other one I like is SketchBook, Autodesk SketchBook, this one is really nice, it gives me a line that I really like, it is a little difficult to work in, you know what actually I like this part a lot, you can turn it, this part is actually more responsive I think than the Astropad, I really, I do like the line I get it in this, it takes some time getting used to the tools and you know what if I decided that I was just going to do all of my cartoons in SketchBook or Procreate I could, but there is really no reason, I mean I have the computer at home, like I just bought this thing a year ago, it’s not like I’m going to not use it, and there are tools that SketchBook and Procreate don’t have, at least I don’t think they have, like one of them has text, I don’t remember which one, but they don’t have like the font I like to use, so I could do it with some work around, but I have the computer at home and I’m at home during day, so I may as well use it, so I’m going to stick with Astropad and I’m using Adobe Photoshop CS5, I’m not using 6 or whatever the new one is, the CC, I forgot what that’s for, but I’m still using old fashion CS5 and it works really well for me.

Apple Pencil Conclusions

So long story short, I really after a month of getting used to how the pencil feels, how Astropad works with the iMac and getting the right line and all that, I’m really-really pleased, plus I mean when you are done with it you’ve got an iPad, so I can – if I’m ever bored I can go like uh time for little – time for a little racing here before I get back to my drawing, oh yeah alright enough of that, I’m going check my email, check my calendar, all that stuff and then I can get right back to the art and of course when I’m done I can take it with me. I also like to, there is no wires here, that was one of the things I really just liked about the Cintiq was that it had that big long wire, there is nothing here, there is nothing connecting this to the computer. So there is less spaghetti in my office, so I really like that. So alright, so there is my rambling review of how I like the iPad Pro and the Apple Pencil. So if you are an artist who wants to give it a shot, I would definitely recommend it, I think it’s fantastic, I really like the line, I like the way it feels now, and I like being able to take it with me, so if you are contemplating a switch from the classic Cintiq over to the iPad Pro, I think its good move, so that’s it, hope you enjoyed it, bye.

Cartoon Close-Up – Worducate SAT

Cartoon Close-Up is a recurring feature where I highlight Andertoons cartoon subscribers, custom cartoon clients, and customers who just buy the occasional cartoon.

Cartoon Close-Up 1

This edition’s answers come from subscriber Jodi at Worducate.com.

1) Tell me a little about yourself and your job.

Jodi has a background in psychology and marketing while Jim has a background in programming and entrepreneurship. We are both currently in the process of developing several educational and gaming iPhone apps. We find it interesting and challenging to keep abreast of new technology.

2) How do you use the cartoons from your Andertoons subscription?

The cartoons from our Andertoons subscription are a great fit for Worducate SAT, our iPhone SAT study app that utilizes synonyms to help students improve their SAT and ACT scores. After studying our synonym cards of SAT vocabulary words, students are directed to a practice section. They have been hard at work learning new vocabulary words, and then they see a fun Andertoons cartoon that lightens the mood.

The Andertoons cartoons add an element of humor and irreverence to our study app, to keep students engaged while they use Worducate SAT to raise their SAT and ACT scores!

Cartoon Close-Up 1

 3) Please give me an example of how someone has responded to a cartoon.

Prior to using your cartoons we tried using motivational stock images, but our test audience described these with comments such as “cheesy” and “not my thing.” As soon as we switched to Andertoon cartoons, we got a much more positive response–and a few laughs! They are a much better fit for our audience of students because they show the humor in the mundane. Studying for the SATs and applying to college can be challenging and stressful. It’s important to take a moment to laugh and enjoy the process.

 4) Which cartoon is your personal favorite?

I love this one! It is so funny and relatable! It also speaks to our desire to be recognized.

Cartoon 6586

 5) Where online can people find out more about you?

People can download Worducate SAT on the Apple iTunes store (our anticipated launch date is September 2015). We are also planning versions of Worducate to help people study for the GREs as well as to expand everyday vocabulary and aid ESL learners. You can contact us through our website, Worducate.com.

 6) Do you have any questions for me?

How does it feel to know that your work puts a smile on people’s faces? 

Aw shucks…

Long answer:

One of the weird things about being a cartoonist is the disconnect between you and the reader. A comedian gets an immediate reaction from an audience, but cartoonists mostly never get to see their work being enjoyed. You just send your cartoons out into the world to fend for themselves and hope for the best.

Occasionally, however, you get to watch someone read a cartoon of yours and it’s both terrifying (during the read) and exhilarating (when they laugh).

Short answer:

Awesome.

Thanks so much to Jodi for her time and terrific answers!

If you use Andertoons cartoons and would like to be featured here on the blog and in our monthly newsletter, drop me a line!

109

109.

That’s the number of Apple Thunderbolt 27″ hi-res displays, each maxed out at 2560 x 1440 pixels, you’d need if you wanted to simultaneously show every web-ready cartoon you get with an Andertoons Pro Subscription.

Here’s what 109 displays stacked neatly looks like:

Cartoon Subscriptions 1

And, just for fun, here’s what 109 displays looks like in a big messy pile:

Cartoon Subscriptions 2

With an Andertoons Cartoon Subscription you get thousands of cartoons you can use to grab attention in websites, blogs, Facebook, Twitter, Google+, and Pinterest and more, starting at just $20 month.

Try one out today!

(I’d show you the number of displays needed to show each hi-res cartoon you’d get with an Andertoons Premium Subscription, but that would mean cutting and pasting over 1000 displays in Photoshop. And I’d rather draw up some new cartoons.)

Adding a Cartoon (Or Any Other Image) To Your iBook in iBooks Author – Tutorial

As I’m sure you’ve heard, Apple recently entered the textbook market in a big way. They’ve partnered with Pearson, McGraw Hill, and Houghton Mifflin Harcourt, revamped the iBooks app/store, and created the iBooks Author application to make publishing and selling books quick and easy. This is a big deal, and I’ve got a front row seat being married to an educator and having two children in school.

But as exciting as it is educationally, as a cartoonist I’m thrilled not only by the self-publishing opportunities for myself and other artists, but by what could conceivably be a whole new market for cartoons.

I can imagine all kinds of people writing and selling all kinds of books via iBooks Author, so I thought I’d explain the process of inserting a cartoon (or any other graphic) to help liven up all of that text.

Starting Your iBook

The first thing you’ll need to do is download the free iBooks Author app from the App Store and wait for it to install. Open iBooks Author and you’ll be greeted with the Template Chooser:

ibook cartoon templates

For the purpose of this tutorial we’re going to choose the generic Botany textbook. Click on it and you’ll be greeted with the book’s first chapter in landscape orientation:

ibook cartoon template

Apple has already included a stock image to show you how much an image can improve your book, but we’re going to navigate to page three where there’s a huge swath of text just waiting for a funny cartoon to liven things up:

ibook cartoon text

Because this is a botany iBook, I’ve chosen this one about roses:

Now let’s get started!

Inserting Your Cartoon

There’s a number of ways to import your image, but I’m just going to grab the JPEG off of my desktop and drag it over the text:

ibook cartoon drag jpeg

Here’s how the image looks inserted into the text:

ibook cartoon placement

Nice, huh? Just what all those words needed.

The cartoon is placed on the page by default as either an anchored or floating object (that will be important later) which can be moved, resized, and aligned with some intuitive clicking and dragging:ibook cartoon center resize

Now our iBook page is looking just like we’d like it to. Let’s preview it on our iPad to see how it will look to our soon-to-be readers.

Connect the iPad to your computer, open iBooks, and, if you’re like me, you’re going to preview it in portrait orientation first:

ibook cartoon ipad portrait 1

Here’s a screen shot of page 3 from my iPad, but where’s the cartoon!? And what’s with all that white space on the left? Flip the iPad 90 degrees and you’ll see it appear in landscape orientation exactly as you inserted it:

ibook cartoon ipad landscape 1

So what’s going on? Where’s the cartoon in portrait?!

There are two ways to deal with this. The first changes some elements of the existing image, the second is a different way of bringing images into your iBook. Let’s start with what I think is the simpler of the two:

Adding a Title or Caption

Images imported into iBooks Author are referred to as objects, and there are three different kinds of objects. You might remember earlier I said that images are inserted by default as either anchored or floating objects. Those two types of objects don’t appear in portrait orientation unless you give them either a title or a caption. Thankfully, that’s pretty easy to do.

Click on your image, then click Inspector in the upper right menu bar. Next click the rightmost icon in the Inspector menu; it looks like a folder with a gear on it. (If you leave your mouse on it you’ll see “Widget Inspector.”)

ibook cartoon title caption

Click the Title check box underneath Layout and your cartoon now has a dummy text title as well as a light gray border around it:

ibook cartoon title changes

You can also opt to add a caption below the image instead, but since the image we’re using is a cartoon, I chose a title. I also played with the background and margin settings. Now let’s look at it in portrait orientation again on the iPad:

ibook cartoon portrait title 1

There it is in the upper left, and when you click on it:

ibook cartoon portrait title 2

Pretty nice. Here it is in landscape again with the title over the cartoon:

ibook cartoon landscape title

Now, you might not want that extra text above or below your image. In that case, still click Title or Caption, but just delete the dummy text and don’t replace it with anything. You get a little extra padding on the top and/or bottom, but it’s not obvious.

Adding A Cartoon Inline

I said earlier that there was another way to insert your cartoon into the text to make sure it appears in portrait mode, and that is to change the image to an inline object. This is best done when you’re first inserting the cartoon into the text, but it’s still fairly simple.

Let’s begin again with a page 3 full of text:

ibook cartoon inline prep

You could drag in your image and then change the object type to inline, but I’ve gotten some wonky results that way. Here is what I think is a better way to add images inline.

First, choose roughly where you’d like to add the cartoon and insert a blank line there. For this example I’m going to add it before the second paragraph on the left half of this page:

ibook cartoon inline blank line

Now this is where it gets tricky. Press and hold the Command key, then drag the image off of your desktop and into the document where you left your blank line:

ibook cartoon inline insereted

It might take a little trial and error, but you’ll soon get the hang of it.

And now when we preview on the iPad we see the cartoon inline in both landscape and portrait orientations:

ibook cartoon ipad inline landscape

ibook cartoon ipad inline portrait

With the inline method of inserting your cartoon there’s also no need for title or captions. In fact those are not available to an object designated as inline.

You might be asking yourself why you’d want to present your images inline, but if you’re considering publishing an iBook collection of cartoons where there’s very little text, inline begins to make a whole lot of sense.

As exciting as this new opportunity is, both as a potential publisher and content provider, there’s bound to be some glitches in this first iteration of iBooks Author, but I’m finding it hard not to daydream about the possibilities. And I can’t wait to see how other people use this new tool!

So now that you understand how to insert a cartoon or other image into your new iBook, there’s the small matter of…

Buying Your Cartoon

Of course the first step to adding a cartoon is to find a relevant cartoon you’d like to include in your iBook. Andertoons has thousands of cartoons on thousands of topics that are super easy to browse, buy, and download. That being said, this is a brand new market and I’m a bit unsure as how to proceed as far as price.

Normally I charge hundreds of dollars per cartoon for textbook usage, but I’m envisioning a lot of independent authors self-publishing via iBooks Author, so I’m going to begin selling iBook cartoon usage at the $30 per I currently charge for presentations.

If you’re interested in buying a cartoon for your iBook, just click the $30 presentation button and follow the checkout – no need to email me for permission. If you’re a big name publisher, drop me a line and we’ll work out something fair.

I hope this helped explain how to add a cartoon or other image to your new iBook via iBooks Author. Anyone have have any big plans for an iBook?